What if your digital micrometer is lying by just 0.0002 inches-and every part you approve is already out of spec?
Accuracy drift rarely announces itself with a total failure. It shows up as inconsistent readings, failed repeatability checks, temperature-sensitive measurements, or calibration results that slowly move out of tolerance.
This guide walks you through a practical, step-by-step process to isolate the cause of digital micrometer accuracy drift-from dirty anvils and weak batteries to worn measuring faces, improper technique, and calibration issues.
By the end, you’ll know how to verify the problem, correct the most common causes, and decide when the tool needs professional service or replacement.
What Causes Digital Micrometer Accuracy Drift: Calibration, Temperature, Wear, and Handling Factors
Digital micrometer accuracy drift usually comes from small changes that build up over time, not one dramatic failure. The most common cause is missed or poor calibration, especially when the micrometer is used daily in machining, quality control, or inspection work. A certified gauge block set, such as Mitutoyo gauge blocks, is one of the simplest tools for checking whether readings are still trustworthy.
Temperature is another major factor. A micrometer, the part being measured, and the operator’s hands can all expand or contract slightly, which matters when you are working in thousandths or microns. In a real shop, I’ve seen a micrometer read differently after sitting near a CNC machine enclosure compared with the same tool left on a granite surface plate in a controlled inspection room.
- Calibration issues: Zero error, worn standards, or skipped calibration service can cause repeatable but incorrect readings.
- Mechanical wear: A worn spindle, dirty anvil faces, or weak ratchet thimble pressure can change measuring force.
- Handling damage: Dropping the tool, overtightening, coolant exposure, or storing it loose in a toolbox can affect alignment and electronics.
Battery condition and electronic stability also matter. Low batteries can cause flickering displays, sudden zero shifts, or inconsistent readings, so replacing the battery is a low-cost troubleshooting step before paying for professional calibration services.
For critical measurements, clean the anvils, let the tool acclimate, check zero, then verify with a known standard. This quick routine helps separate normal shop variation from a micrometer that needs repair, replacement, or accredited calibration.
How to Troubleshoot a Drifting Digital Micrometer Step by Step Using Gauge Blocks and Repeatability Checks
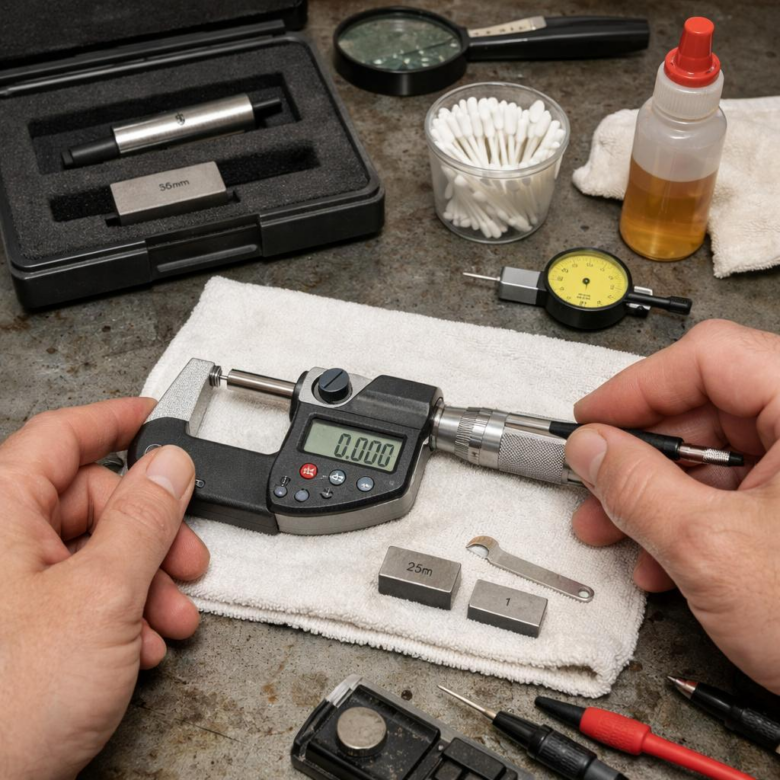
Start by cleaning the measuring faces, spindle, and certified gauge blocks with lint-free wipes. Even a light oil film or shop dust can make a digital micrometer look unstable, especially at 0.001 mm or 0.00005 in resolution. Let the micrometer and gauge block set sit in the same area for at least 20-30 minutes if they came from a cold toolbox or warm inspection room.
Zero the micrometer gently, then check it against at least three gauge block sizes across its range, such as 5 mm, 12.5 mm, and 25 mm for a 0-25 mm micrometer. Use a calibrated set, preferably with an ISO 17025 calibration certificate, and record each reading. A tool like a Mitutoyo digital micrometer should return close to the same error pattern each time; random changes usually point to handling, battery, contamination, or spindle issues.
- Measure each gauge block five times, removing and reseating the block each time.
- Use the ratchet or friction thimble consistently; do not “feel” the pressure by hand.
- Log the readings in a calibration software system or a simple spreadsheet.
Look for repeatability first. For example, if a 10 mm gauge block reads 10.002, 10.002, 10.003, 10.002, and 10.002 mm, the micrometer is repeatable but may need calibration adjustment. If it jumps from 10.000 to 10.006 mm, inspect the spindle movement, battery contacts, anvil wear, and possible coolant residue before sending it to professional calibration services.
In real machine shops, I often see “accuracy drift” caused by measuring warm parts straight off a CNC machine, not by a bad micrometer. Confirm the tool on room-temperature gauge blocks before approving repair cost or replacement.
Common Mistakes That Worsen Micrometer Accuracy Drift and How to Prevent Recurring Measurement Errors
One common mistake is treating a digital micrometer like a general shop tool instead of a precision measuring device. Dropping it into a toolbox, measuring hot parts straight off a CNC machine, or wiping the spindle with an oily rag can slowly create repeatable errors that look like random accuracy drift.
In a real inspection room, I’ve seen a 0.001 mm digital micrometer fail a verification check simply because fine grinding dust had built up on the anvil face. A quick clean with lint-free wipes and verification against certified gauge blocks restored stable readings, avoiding unnecessary repair cost or outside calibration service delays.
- Skipping daily zero checks: Verify zero before use and after temperature changes, especially in high-volume quality control environments.
- Using too much measuring force: Use the ratchet or friction thimble consistently; hand pressure variation is a major cause of recurring measurement errors.
- Ignoring calibration records: Track drift history with tools like Mitutoyo MeasurLink or a calibrated asset management system.
Temperature is another overlooked issue. A micrometer stored in an air-conditioned metrology lab but used on warm machined parts will not match readings taken after both the tool and workpiece stabilize, which matters for tight-tolerance aerospace, medical device, and automotive components.
To prevent repeat problems, set a simple routine: clean the anvils, check against certified gauge blocks, document out-of-tolerance readings, and schedule ISO 17025 calibration when drift trends repeat. This approach reduces scrap, improves measurement reliability, and helps justify the cost of professional calibration equipment or calibration services.
Final Thoughts on Step-by-Step Guide to Troubleshooting Digital Micrometer Accuracy Drifts
Accuracy drift is rarely a single-event problem-it is a control problem. The best takeaway is to treat every unexpected reading as a signal: verify the environment, inspect the tool, check technique, then confirm against a trusted standard.
If the micrometer returns to specification after cleaning, stabilization, or zeroing, keep it in service with closer monitoring. If drift repeats, varies unpredictably, or exceeds tolerance after calibration checks, remove it from use and escalate to professional service or replacement. In precision work, the safest decision is simple: trust the measurement only when the tool, method, and standard all agree.