Want charcuterie-level cured meats without gambling on humidity, airflow, or food safety?
Curing meat is a precise craft: salt, time, temperature, humidity, and controlled air movement all have to work together. A professional dry-aging chamber gives you the stable environment needed to turn raw cuts into deeply flavored, safely cured products.
This step-by-step guide walks you through selecting the right meat, applying cures, setting chamber conditions, monitoring weight loss, and recognizing when your product is ready.
Whether you’re making bresaola, pancetta, coppa, or whole-muscle salumi, the goal is the same: consistent results, clean flavor, and a curing process you can actually control.
Dry-Aging Chamber Fundamentals: How Controlled Temperature, Humidity, and Airflow Cure Meat Safely
A professional dry-aging chamber works by keeping meat in a narrow, stable environment where moisture leaves slowly while enzymes tenderize the muscle. For whole-muscle beef, most operators aim for refrigeration-level temperature, controlled relative humidity, and continuous airflow; when one of these drifts, you can get case hardening, sour odors, or unsafe surface growth.
In practical terms, the chamber should be treated like a precision food safety device, not just a display fridge. A reliable digital hygrometer, calibrated thermometer, and data logger such as SensorPush or Inkbird helps track real conditions instead of relying on the cabinet’s built-in display, which can be off by several degrees in real-world use.
- Temperature: Keep it cold and consistent to slow harmful bacterial activity while allowing natural enzymatic tenderization.
- Humidity: Too low dries the exterior too fast; too high encourages tacky surfaces and unwanted mold.
- Airflow: Gentle circulation removes moisture evenly without blasting the meat like a fan-forced dehydrator.
For example, a ribeye subprimal placed too close to a strong fan may form a hard outer crust within the first week, trapping moisture inside and reducing final yield. Moving the cut to a central rack and using a lower-speed fan often produces a cleaner pellicle, better trim recovery, and more consistent flavor development.
Commercial dry-aging cabinets, stainless steel racks, UV sanitation systems, and replacement humidity controls add cost, but they also reduce guesswork. That matters whether you are aging premium beef for a restaurant menu or running a small butcher shop where food safety inspections, product loss, and equipment reliability directly affect profit.
Step-by-Step Meat Curing Process: Preparation, Salting, Chamber Setup, Monitoring, and Finishing
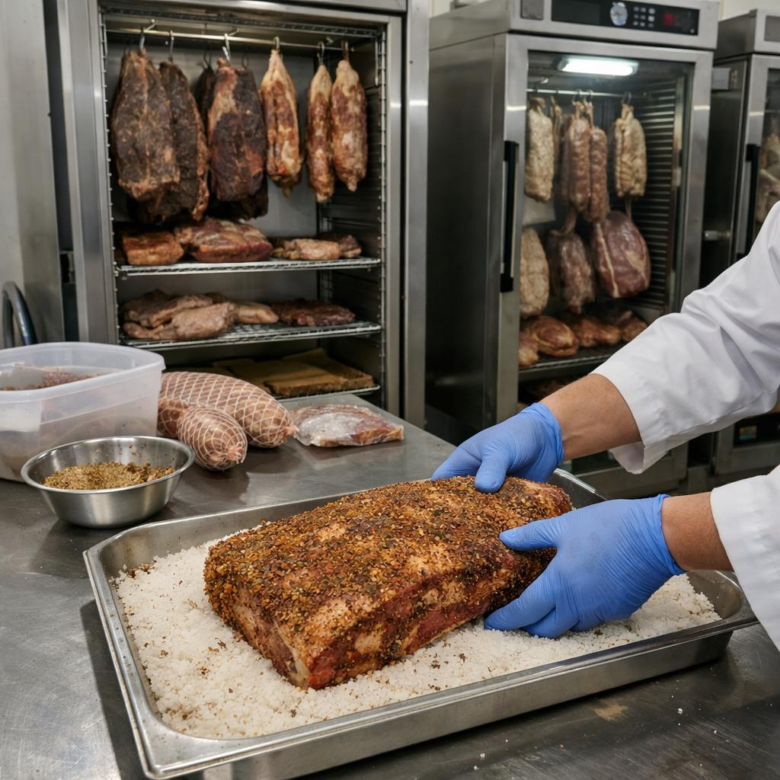
Start with fresh, high-quality meat from a trusted butcher, ideally whole muscle cuts like pork loin, beef eye round, duck breast, or bresaola-style topside. Trim loose edges and surface fat pockets, then weigh the meat accurately because your curing salt calculation depends on weight, not guesswork. A digital scale and a reliable cure calculator are as important as the professional dry-aging chamber itself.
For dry curing, apply salt, curing salt if required, sugar, and spices evenly across the surface, then vacuum seal or bag the meat for the curing phase. A practical example: a 1 kg pork loin for lonzino is commonly cured in the refrigerator for several days, turned daily so the cure distributes evenly. I’ve found that uneven salting usually shows up later as soft spots, so take your time here.
- Temperature: keep the curing chamber around 50-59°F depending on the product.
- Humidity: target roughly 70-80% RH to prevent case hardening.
- Airflow: use gentle circulation, not direct fan blasting.
Set up the chamber with stainless steel hooks or racks, a calibrated hygrometer, and a dependable controller such as the Inkbird ITC-308 for temperature management. For serious home charcuterie, investing in a dry-aging cabinet with humidity control, food-safe surfaces, and washable drip trays reduces risk and maintenance cost over time.
Monitor weight loss, smell, texture, and surface mold weekly. Most whole-muscle cured meats finish when they lose about 30-40% of their original weight and feel firm but not rock hard. After curing, brush off harmless white mold, vacuum seal the meat, and let it equalize in the refrigerator before slicing thinly for the best texture.
Professional Optimization and Common Mistakes: Preventing Mold, Moisture Loss, Case Hardening, and Flavor Defects
In a professional dry-aging chamber, most curing problems come from poor airflow, unstable humidity, or rushing the drying curve. A reliable digital hygrometer such as SensorPush or Testo is worth the cost because the built-in display on many chambers can be off by enough to affect texture, yield, and food safety.
Case hardening happens when the outside dries too quickly and traps moisture inside the meat. In real curing rooms, this often shows up on smaller salami or whole-muscle cuts placed too close to the fan: the exterior feels firm, but the center stays soft and uneven. Reduce direct airflow, verify humidity, and rotate products so no piece sits in a “wind tunnel.”
- Unwanted mold: White powdery mold is often acceptable in traditional curing, but black, green, fuzzy, or wet-looking growth should be treated as a warning sign. Clean chamber surfaces with food-safe sanitizer and check for condensation points.
- Excess moisture loss: If weight drops too fast, increase relative humidity slightly and inspect door seals, drainage, and fan speed settings.
- Flavor defects: Sour, rancid, metallic, or ammonia-like aromas usually point to sanitation issues, poor raw material quality, incorrect curing salt use, or temperature abuse.
Keep a curing log with starting weight, weekly weight, chamber temperature, humidity, and visual notes. This simple record helps identify whether a defect came from the meat, the curing process, or the dry-aging equipment itself.
The Bottom Line on Step-by-Step Guide to Curing Meats Using Professional Dry-Aging Chambers
Successful meat curing depends on control, patience, and consistency. A professional dry-aging chamber gives you the precision needed to manage temperature, humidity, airflow, and hygiene with confidence-turning curing from guesswork into a repeatable craft.
- Choose a chamber if you want safer results, better flavor development, and fewer environmental variables.
- Start with small batches, track every adjustment, and refine your process over time.
- Invest in quality equipment if cured meats will be a regular part of your kitchen, butcher shop, or specialty food program.