Why does a glossy clear coat sometimes dry looking like citrus skin instead of polished glass?
Orange peel texture is one of the most frustrating flaws in scale modeling because it usually appears at the final stage, after the paint and decals already look perfect.
The good news: it is almost always fixable, and more importantly, preventable once you understand what caused the clear to dry rough, pebbled, or uneven.
In this guide, you’ll learn how to diagnose orange peel in clear coats, correct it safely without destroying underlying details, and adjust your spraying technique for a smoother, deeper finish on future builds.
What Causes Orange Peel Texture in Scale Model Clear Coats?
Orange peel happens when a clear coat starts to dry before it has enough time to level out. Instead of flowing into a smooth gloss finish, the surface stays slightly bumpy, much like the skin of an orange. On scale models, this is usually caused by poor paint atomization, incorrect thinning, or spraying from too far away.
One common cause is using an airbrush setup with pressure that is too high or too low for the clear coat. For example, spraying lacquer clear through an Iwata Eclipse at high PSI from a long distance can make the clear dry mid-air, leaving a rough, pebbled finish on a car body or aircraft fuselage. A weak airbrush compressor without a moisture trap can also create inconsistent spray patterns.
- Clear coat too thick: Heavy viscosity prevents the finish from self-leveling properly.
- Wrong thinner or ratio: Fast-drying thinner can flash off too quickly, especially with lacquer clear coats.
- Bad spraying conditions: High heat, low humidity, poor ventilation, or a dusty spray booth can all affect the final surface.
Distance matters more than many beginners expect. If the clear lands dry instead of wet, orange peel is almost guaranteed. In real hobby use, I often see this when builders apply automotive-style clear coat to 1/24 scale model cars using the same technique they use for primer, but clear needs wetter, more controlled passes.
Surface preparation can also contribute. If the base coat is rough, contaminated with polishing compound, or not fully cured, even a premium gloss clear coat may not level correctly.
How to Fix Orange Peel Clear Coat with Sanding, Polishing, and Recoating
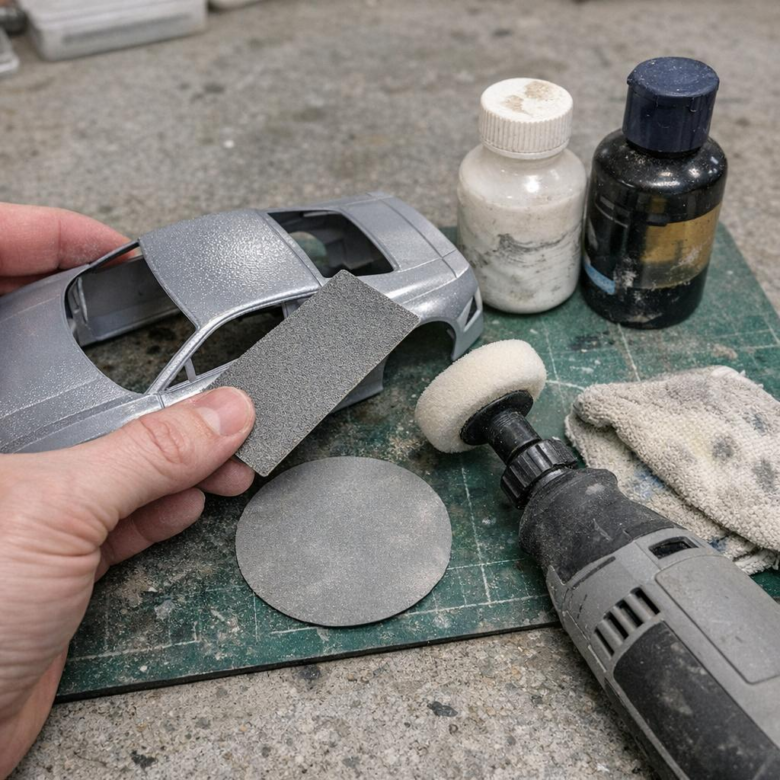
Start by letting the clear coat fully cure before touching it. For lacquer clear coats, I usually wait at least 48 hours; for thicker gloss coats or humid conditions, several days is safer because sanding soft clear can tear the finish instead of leveling it.
Use wet sanding to flatten the texture, not remove the whole clear coat. Begin with 3000 or 4000 grit sanding sponge, then move through 6000, 8000, and 12000 grit with a product like Micro-Mesh or 3M Trizact. Keep the surface wet and use light pressure, especially around raised details, panel lines, decals, and sharp edges.
- If the surface turns evenly dull, you are leveling the orange peel correctly.
- If color appears on the sanding pad, stop immediately because you have cut through the clear.
- If decals feel raised, avoid aggressive sanding and plan on another light clear coat instead.
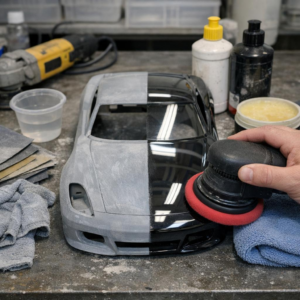
After sanding, polish the surface with a fine model-safe compound such as Tamiya Polishing Compound Fine, followed by Finish if you want a deeper gloss. A cotton pad or soft microfiber cloth works well; rotary tools can burn through clear coat quickly on small scale model parts.
For example, on a 1/24 car body with pebbly 2K clear, leveling with 4000-12000 grit and polishing can restore a showroom gloss. If the orange peel is too deep, sand it mostly flat, clean with a lint-free cloth, then apply two light mist coats followed by one controlled wet coat for a smoother recoated finish.
Common Clear Coat Spraying Mistakes That Create Orange Peel on Scale Models
Orange peel usually starts before the clear coat even lands on the model. The most common mistake is spraying clear too dry, often from holding the airbrush too far away or using pressure that is too high. By the time the lacquer, acrylic, or 2K clear reaches the surface, the solvent has already flashed off, leaving a rough, pebbled texture instead of leveling smoothly.
Another big cause is poor thinning. Many hobby clears need the right reducer, not just “whatever thinner is on the bench.” For example, spraying Tamiya LP clear through a Harder & Steenbeck Evolution with too little lacquer thinner can create a grainy finish on a 1/24 car body, especially across large flat panels like the hood and roof.
- Spraying too far away: Keep the airbrush close enough for the clear to land wet, usually around 3-5 inches depending on pressure and nozzle size.
- Using the wrong air pressure: Excessive PSI can dry the coat mid-air; a regulated airbrush compressor helps keep application consistent.
- Applying heavy coats too soon: Flooding the surface traps solvent and can leave uneven texture, runs, or cloudy clear coat.
Temperature and airflow matter more than many modelers expect. A strong spray booth fan, cold room, or fast-drying thinner can make the clear skin over before it levels. In real bench work, I see orange peel most often when builders upgrade to gloss clear coat products but keep using the same quick mist-coat technique they used for primer.
Wrapping Up: How to Fix Orange Peel Texture in Scale Model Clear Coats Insights
Orange peel is fixable, but the best result comes from knowing when to stop and when to correct. If the clear coat is still uneven but has enough thickness, level it patiently with fine abrasives and polish back the shine. If the texture is severe, thin, or contaminated, stripping and recoating is usually safer than chasing a perfect finish.
Practical rule: adjust one variable at a time-thinner ratio, spray distance, pressure, or coat wetness-then test before returning to the model. A smooth clear coat is less about one magic product and more about controlled application, curing time, and restraint.