Is your CPU “stable” until the motherboard quietly starts cooking itself?
VRM overheating is one of the most overlooked causes of crashes, clock drops, stuttering, and sudden shutdowns under heavy load-especially on high-core-count CPUs, compact cases, or boards with weak heatsinks.
The problem is that VRM thermals don’t always announce themselves clearly: your CPU temperature may look fine while the power delivery circuitry is throttling, saturating, or running beyond safe limits.
This guide shows you how to identify motherboard VRM overheating with real symptoms, sensor data, stress testing, airflow checks, and practical fixes-before instability turns into permanent hardware damage.
What Motherboard VRM Overheating Looks Like Under Sustained CPU Load
Motherboard VRM overheating usually shows up when the CPU is held at high power for several minutes, not during quick desktop tasks. Under a sustained CPU load such as video rendering, compiling code, running a virtual machine, or a CPU stress test, the processor may suddenly drop clock speed even though CPU core temperatures look acceptable.
A common sign is inconsistent performance: the system starts fast, then slows down after 5-15 minutes as the VRM area near the CPU socket gets too hot. In HWiNFO64, you may see readings labeled VRM MOS, motherboard temperature, CPU package power, or “thermal throttling,” depending on the board sensors available.
- CPU clock speed drops sharply while CPU temperature is still within a safe range.
- Benchmark scores fall on repeated runs, especially in Cinebench, Blender, or Prime95.
- The PC may shut down, reboot, or freeze during heavy all-core workloads.
In real-world testing, I often see this on budget B-series motherboards paired with high-core-count Ryzen or Intel Core i7/i9 CPUs, especially inside compact gaming PC cases with weak airflow. The CPU cooler may be excellent, but if it is a large tower cooler or AIO liquid cooler, it may not push enough air across the VRM heatsinks.
Physical signs can help too. If the heatsink beside the CPU socket is too hot to touch after a long render, or an infrared thermometer shows unusually high temperatures around the power delivery section, VRM cooling should be investigated. This is where better case fans, BIOS power limits, or a motherboard upgrade can make a measurable difference.
How to Diagnose VRM Temperatures Using Sensors, Stress Tests, and Physical Inspection
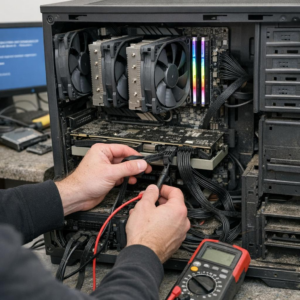
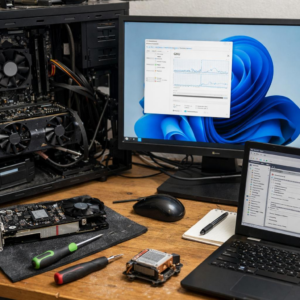
Start with motherboard sensor readings, but treat them as clues rather than absolute truth. Tools like HWiNFO64, AIDA64, and motherboard vendor software can show “VRM MOS,” “VRM,” “Motherboard,” or “CPU VRM” temperature sensors, depending on the board model. If the VRM sensor climbs rapidly during CPU load while CPU core temperatures remain reasonable, the power delivery area is likely the problem.
Run a controlled stress test using Cinebench R23, OCCT, or Prime95 while watching VRM temperature, CPU clock speed, and motherboard throttling behavior. For example, on a Ryzen 9 system I’ve seen stable CPU temperatures but sudden clock drops after several minutes because the VRM heatsink was getting heat-soaked inside a compact case. That kind of pattern often points to poor airflow over the VRM heatsink, not a bad processor cooler.
- Check sensor trends at idle, gaming load, and full CPU stress load.
- Watch for clock speed drops, shutdowns, black screens, or “VR thermal throttling” flags.
- Compare results with the side panel removed to confirm a case airflow issue.
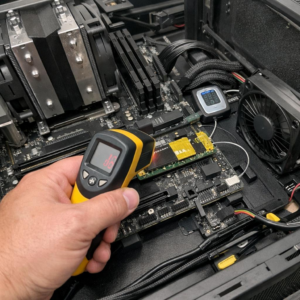
Physical inspection matters, especially on budget motherboards or high-wattage CPUs. Look for undersized VRM heatsinks, dust buildup, weak case fan placement, or an AIO liquid cooler setup that removes airflow normally provided by a tower air cooler. If available, an infrared thermometer or thermal camera can help verify hot spots around the MOSFETs and chokes, giving you better evidence before spending money on cooling upgrades or motherboard replacement.
Common VRM Cooling Mistakes That Cause Throttling, Crashes, and Power Instability
One of the most common VRM cooling mistakes is assuming the CPU temperature tells the whole story. I’ve seen gaming PCs pass a CPU stress test at reasonable core temps while the motherboard VRM overheats badly enough to trigger clock drops, random shutdowns, or black-screen crashes under Blender, Prime95, or long gaming sessions.
Poor case airflow is usually the first problem to check, especially with tower air coolers, vertical GPU mounts, or compact cases. VRM heatsinks need direct airflow, and a rear exhaust fan alone may not be enough for a high-wattage Ryzen or Intel Core i9 build.
- Using cheap or overly thick thermal pads that prevent proper heatsink contact.
- Removing motherboard heatsinks during cleaning and reinstalling them unevenly.
- Running aggressive overclocking or unlocked power limits on a budget motherboard.
Another real-world issue is relying only on software readings. Tools like HWiNFO are excellent for motherboard sensor monitoring, but not every board exposes accurate VRM MOSFET temperatures, so a thermal camera or infrared thermometer can be worth the cost for serious PC diagnostics.
Dust buildup around the VRM heatsink also matters more than many users expect. A workstation used for video editing or 3D rendering can run stable for months, then start crashing simply because dust blocks the small airflow path over the power delivery components.
For reliable fixes, prioritize airflow tuning, quality thermal pads, sensible BIOS power limits, and a motherboard with a stronger VRM design if you are building a high-performance PC. Better cooling is cheaper than replacing a damaged motherboard.
Expert Verdict on How to Diagnose Motherboard VRM Overheating Under Heavy Load
VRM overheating is not a minor nuisance-it is a stability and longevity warning. If heavy-load testing shows rising VRM temperatures, throttling, crashes, or inconsistent CPU behavior, treat it as a cooling or motherboard capability issue rather than a software problem.
The practical decision is simple: improve airflow and VRM heatsink contact first; if temperatures remain unsafe under your normal workload, reduce CPU power limits or reconsider the board choice. A system that only stays stable by running its VRM near the edge is not properly matched to the processor or workload.